Horace Martin invented the Speed Key in 1904 and his Original design is still in production today. Its a mystery as to why he would have named his new creation in 1911 as the Model X ---which denotes something devious LOL --- The Model X uses one contact for both dots and dashes. To accomplish it, he extended the dash lever to the CENTER of the key and then he extended the dual purpose leaf spring contact assembly from the rear of the key to the CENTER. So both dots and dashes are made at the very CENTER of the key!!! He used that design until 1919 --when he realized the designs short comings and developed what he called "The New and Improved Model X". The Improved Mod X in 1920 had a different mechanical arrangement for the Dash Lever.. which I describe in detail below. And it also provided a round pendulum arm rather than a square pendulum.. So the original Mod X uses square weights and the Improved Mod X uses round weights. However, the Model X was discontinued a few years later in 1922. But during the same time frame, he came out with the Upright Speed key in 1917-- which uses a Model X arrangement vertically. But the Upright was discontinued in 1919 when he came out with the New & Improved Model X. The Upright was also called the Wire Chiefs key ---as it didnt take up much room on the desk ---- At that time, he was also selling the Double Lever key --which started production in 1907 but ended in 1926 --the same year he came out with the new Lightning Speed key. So Horace was always busy with new ideas!! The Double Lever came in 3 variations----but I've never had the desire to use or collect any of the Double Lever creations. Due the standard Original Vibroplex keys work so well!!!
You'll notice in the literature below I keep repeating the need for proper grounding of speed keys. Which was intentional so that everyone understands its importance.
There are a number of reasons your key can produce Dot Stutter and Fuzzy Sounding Dots. Dot stutter is caused by the dot arm hitting the damper wheel with too much force, which forces the dot arm back on itself.. producing dot stutter.. so its important to use the very minimum amount of dot side coil spring tension necessary to produce best code. And to properly ground your keys pendulum.
The main reason mechanical speed keys sometimes produce scratchy fuzzy sounding code is due to the lack of proper low resistance continuity over to the keys wire nuts. All speed keys ever made should have come equipped with braid to ground from both the dash lever and the dot lever (or keys pendulum). Its very easy to equip your key with the braid to ground.. The only keys that came with proper braid to ground from the dash and dot levers are the Deluxe McElroy keys made in Boston. When the Mac keys became the TAC company and they moved production to Chicago, they dropped the braid to ground. A screw up on the part of TAC just to save cost of placing the braid. I show pictures of the proper way to install the braid later in the blog. Some people even purchase electronic devices to clean up the keying instead of fixing the problem by installing the grounding braid ! If you dont install the braid to ground, then the keying path over to the wire nuts has to flow through the keys pivots. So fuzzy scratchy dots can be caused by dirty contacts and lack of proper grounding. Back in the early days of telegraphy, the land lines required heavy current flow ---which kept the ground path open, but modern transceivers require a very tiny bit of current and therefore need a perfect low resistance from the keys contact points. If you dont have access to braid, just take some thin 30 gauge wire and coil it on a nail.
The Model X isnt the only speed key with a few mechanical issues.. when Horace developed the Lightning key in 1926, he placed a tiny little pin to hold the dot side coil spring. And that tiny pin doesn't always hold the coil spring steady enough--- causing erratic dots. He should have placed a heavy metal arm to hold that critical coil spring.. So Horace didnt always follow good mechanical engineering practices. The Lightning key was taken off the market in 1982 and I own one of the last production Lightning Deluxe keys as a keep sake! I've owned a large number of different Lightning keys over the years and what happened is ---lack of quality control on the assembly line. They would get careless and drill the hole that holds the tiny pin for the dot side coil spring too large.. causing the pin to flop around. Producing erratic dots. And on some vintage Lightning style keys, the tiny pin that holds the coil spring had an L shape-- which was very lame.. And it also carried over into the Clones of the Lightning .. such as made by Lionel during WW2. Those Lionel keys were deficient in a number of ways.. Some had such weak main springs they could barely make 5 or 6 dots in a row.. But enough of the mechanical issues with different speed keys.. Lets take a close look at the devious Model X!!! I have a huge collection of speed keys of all types and manufacture-- so I've been able to dissect whats good & whats not so good with them.
In the pictures below: I've included not only Mod X keys, but other interesting speed keys made over the years--- so you can get a good idea how speed keys evolved over the past 120 yrs.. The only used key that I ever purchased that came in perfect working condition was a 1950 Deluxe Original with jeweled bearings. When I bought it-- it was 60 yrs old and I expected to receive a key that was all worn out --with everything out of alignment and needing extensive repairs. But I was shocked that every piece part on it was in perfect alignment and the key made perfect code with a proper 3 to 1 dot ratio. So whoever owned it took very good care of it. But out of nearly 100 used keys, it was the only one l've received in perfect working condition.
:::::::::::::::::::::::::::::::::::::::::::::::::::::::::::::::::::::::::::::::::::::::::::::::::::::::::::::::::::::::::::::::::::::::::::::::
Before getting into the lengthy Mod X tuning procedure, here is the adjustment procedure for the Vibroplex Original keys. If you have acquired a 50 to 100 yr old Original, it will usually be all rusty, dirty and totally out of adjustment. And will require completely tearing the key apart and every piece part cleaned with a wire brush to remove all the flop sweat and rust. Cleaning each piece part so that you have perfect continuity over to the keys wire nuts. Cleaning the dot and dash contacts so that there is zero ohms over the keys wire nuts. Then re-assembly it with all the piece parts perfectly and squarely aligned with each other. Having all the piece parts perfectly aligned with each-other is very important. Set the keys right stop screw so that the dot arm is just touching the Damper wheel. The critical adj that takes some fiddling with is the Dot contact spacing. Set the keys left stop screw for slightly less than 1/8" of travel of the moving dot contact with the minimum dot side coil spring tension necessary. You will tweak the dot side coil spring tension and the dot side stop screw and fixed contact spacing for a 3 to 1 dot ratio by placing an analog VOM on R1 ohms scale across the keys wire nuts. And adjust the dot fixed contact spacing for a 50% deflection of the VOM. Which sets a perfect 3 to 1 dot ratio. It has to be an analog VOM-- not a digital VOM. Analog VOM's are still available for a low cost on Amazon. (If you dont have an Analog Vom, it makes it more difficult to provide for a perfect 3 to 1 dot to dash ratio). And you will then tweak the the dot arm coil spring tension so the dot arm dosn't hit the damper wheel with too much force. Too much dot side coil spring tension will force the dot arm back on itself-- causing dot stutter. Then set the Dash arm contact spacing and spring tension for whatever is comfortable. Actually, a very simple procedure --- after you run through it a few times.. the secret for a perfect 3 to 1 dot to dash ratio is using the VOM across the keys wire nuts for a 50% deflection. The only difficult adjustment is setting the dot contact spacing correctly for a 3 to 1 dot ratio. Which will take some tweaking. If you've never adjusted a speed key before, it will take some experimenting to find the spacing you prefer for the Dash contact spacing.. I like a very short spacing of the dash contact for high speed CW.. but if your sending below 20wpm, the dash contact spacing can be larger to suit your sending style. When I first acquired a speed key in the 1950's, I didnt understand how all the settings interacted-- and it took a lot of experimenting till the key was producing proper code. & learning all the mechanical peculiarities of speed keys is helpful. Speed keys were never designed to be used below 20 wpm.
I've adjusted so many speed keys of all different types over the last 62 years that I dont need to use any special techniques or a VOM--- While adjusting the dot contact spacing, I simply watch and listen to the make and break of the dot contact---- & it comes out very close to perfect 3 to 1 dot ratio !!!!!
____________________________________________________________________________________
Now, lets get into the more complicated turning procedure for the Model X..
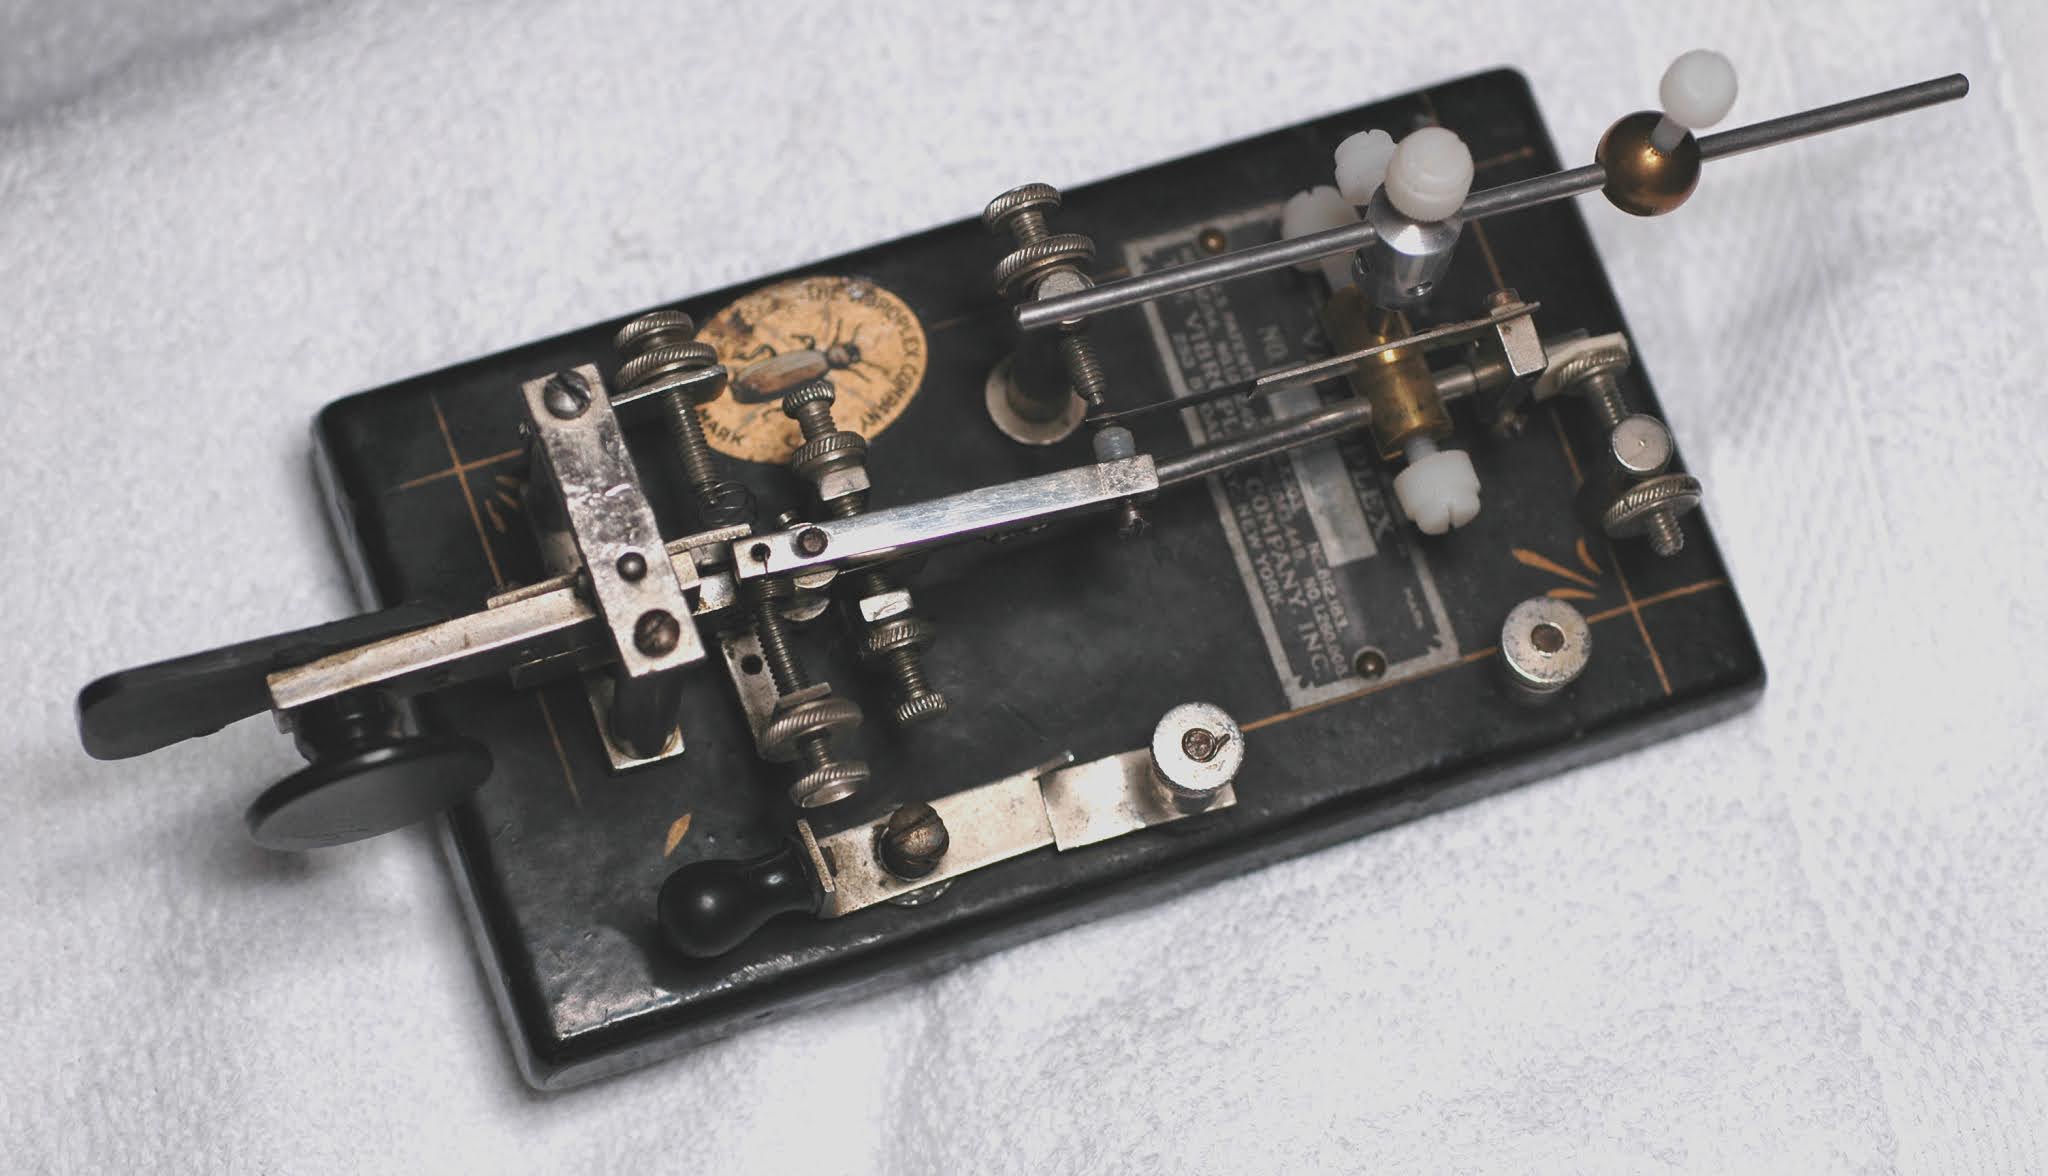
I've collected 10 Model X keys for testing -- from 1912 thru 1920. One in the collection is the New and Improved Mod X made in 1920. Most have had a lot of hard use except for the 1920 Improved Model X. It's in very good condition and the gold pin stripes & Vibroplex Decal are excellent for being 100 yrs old!! I posted a picture of it below. The Model X had a number of issues over its 11yrs on the market.. Like the long leaf spring from the rear of the key is only held to its support arm with rivets at the rear of the support arm. It should have also had a rivet at the front of the metal support arm. But in place of rivet, you can easily add thin tinned wire and solder it in place. On one key I simply wrapped dental floss around the leaf spring to hold the front of the leaf spring to its support arm. Which helps to produce higher quality dots. Another modification that improves its operation is to add a thin ground wire or tiny braid from the keys pendulum arm over to the keys ground wire nut --so that the key provides close to zero ohms in order to key modern transceivers. Otherwise the current flow has to go through the keys pivots... which will cause scratchy dots. Placing a tiny ground wire from the ground wire nut over to the pendulum dosnt require much effort. Back in 1911, land line operation required considerable current flow---but modern solid state transceivers require very small amount of current and therefore require a perfect low resistance ground from speed key. And another interesting fact is Vibroplex only provided thin ground braid from the dash arm over to ground on its Deluxe keys with jeweled bearings. They should have provided that ground braid from the pendulum to ground on all of its keys as well. But users can add it themselves for best keying of modern transceivers----- otherwise the key can and will ---produce scratchy sounding dots. And you will notice people selling special electronic circuits called bug de-scratcher's to help solve the problem..!!! When all along those using speed keys should be fixing the problems with the keys --- which are contacts that are dirty and lack of decent ground continuity to the wire nuts---- and keys which havn't been fine tuned properly.
At the rear of most Mod X keys is a "T" damper that slides back and forth. The adjustable T damper arm provides an easy method to set the position of the damper wheel. Dampening the dot arm after making a series of dots is a very critical adjustment and the adjustable T damper is a plus. The T damper should have been used more often on the different types of Vibroplex keys. I prefer to place 3M double backed tape around the metal damper wheel and then all the dampening of the dot arm takes place on the double backed tape. Just use a little talcum powder on the surface that touches the dot arm--- so its not sticky. Dampening the dot arm is especially important on keys with weak main springs..If the dot arm hits the metal damper wheel with too much force... it causes the dot arm to be forced back on itself ... which causes dot stutter. So proper dampening of the dot arm is a very critical adjustment for best code. With the 1919 new and improved mod X ---they installed a simple damper arm with no damper ring!! so I improved it it by reversing the adjuster knob and then placed 3m doubled backed foam tape onto the adjuster knob surface for the pendulum to dampen onto.. which is an improvement to the new and improved mod X !!! But here's the story of dampening the dot arm--its the most critical adj on the key.. its that important!!! The 3M double backed foam instantly dampens the pendulum arm to prevent dot stutter..
Every speed key ever made should have had braid to ground from both the dash lever and the dot lever or pendulum. Otherwise the current flow for dots and dashes has to flow through the keys pivots. Which can and will cause erratic keying to a modern transceiver. The only speed keys ever made that provided braid to ground from both the dash lever and the dot lever were the McElroy deluxe keys. The Vibroplex Deluxe jeweled bearing keys do provide braid to ground but only for the dash lever. Here is a picture of a Deluxe McElroy S600 Stream key made in Boston before the brand was sold and production of the TAC keys started in Chicago. You can see the heavy braid to ground plainly in this picture. Something that should have been provided on all speed keys ever made. Otherwise the key is prone to produce scratchy dots. You can add the braid or thin wire to ground fairly easily by tapping a threaded hole in the dash and dot lever. Which will be a huge improvement in your keys ability to produce perfect dots on modern transceivers. Unfortunately, when the TAC key production moved to Chicago, they stopped using the braid to ground on their keys. The secret is, if you own a speed key and want the key to produce the best quality code, place braid to ground from both dash and dot levers!! And keep the contacts clean and free from dust and corrosion.

___________________________________________________________________________________
(Adjusting the Model X: The Mod X adjustments are more complicated than fine tuning an Original Vibroplex. It helps if you already own and use an Original Vibroplex before attempting to fine tune the Mod X)
The Model X keys made from 1911 till 1919 have a different mechanical arrangement for the Dash Arm compared to the new and improved Mod X made in 1920.
There are 2 adjustments for the Dash Lever. For the older Mod X keys, set the Dash Lever spring tension adjustment (at the front of the key near the finger pieces) so that at idle-- the dash lever is held to the Right under pressure. Then you set the amount of travel of the dash arm by adjusting the tiny screw near the right of the dash arm. So that the dash lever is not touching the long leaf spring while at idle. So there are 2 adjustments for the Dash Lever... spring tension and position. The 2 adjustments for the Dash Lever are critical to get correct for both dash spring tension and its position --IE--- not touching the long leaf spring at idle. The insulating material at the end of the dash arm can not be touching the leaf spring at idle--- it has to be set about 1/32" away or less from the leaf spring when its at idle position. You tweak it--until making Dashes comes naturally.
With the new and Improved Mod X, the Dash spring tension thumb knob is at the right side of the key and the adjustment for the spacing of the dash lever is at the very end of the dash lever itself (near the Leaf Spring which comes from the rear of the key).. its a screw adjustment ---set so that at idle, the dash lever is not touching the leaf spring. And the very end of the tiny adj screw --it has to have insulating material where it presses against the long leaf spring from the rear of the key. Below are some pictures of the basic model X arrangement and then some pictures of the new and improved Mod X .. showing the placement of the adjustments.
Here is a basic synopsis of the Model X adjustments.
Its basically the same adjustment procedure for both types of Model X. You first set the keys right stop screw so that the pendulum is perfectly in the very middle of the key and square with both left and right sides of the key. Then you adjust the damper wheel position so that the pendulum just touches the damper wheel. The keys left stop screw and the spacing of the contact is then set so that the pendulum motion to make dots produces a 3 to 1 dot to dash ratio. Which is adjusted by placing an old analog VOM across the keys wire nuts and adjusting the contact spacing for a 50% deflection of the VOM on the R1 Ohms scale. You can't use a Digital VOM, it has to be an old Analog VOM.. which are still available for a reasonable cost. You set the keys left side Coil spring tension so that the dot arm dosn't hit the damper with too much force. The adjustments to make dots properly can take some tweaking until you have the perfect 3 to 1 dot to dash ratio. And you have to be sure the contact surfaces are clean and burnished to provide zero ohms to the keys wire nuts. But you need to add thin braid or a thin ground wire from the keys ground wire nut over to the keys pendulum-- in order to key your transceiver properly. If you dont add the ground wire to the pendulum, the current flow for dots and dashes has to flow through the keys pivots and that will cause erratic scratchy keying of the transceiver. There is a picture below of how I added the ground wire to a 1918 Mod X. The ground wire from the ground wire nut to the pendulum should have been provided on every speed key ever made. But you can do the right thing and add it your own self !!!!!! The ground wire has to be very thin flexible copper or thin braid --- as heavier copper wire can stop the free movement of the pendulum. Just take a look at how Vibroplex placed the thin braid on their Deluxe Jeweled bearing keys.
Here are 2 improvements that I've made to the Model X keys.
1. I placed additional support for the long leaf spring on its metal support arm by adding support at the front of the metal arm. The way it comes from the factory, and long leaf spring is only supported at the rear of its metal support arm. And supporting it at both front and rear helps improve the quality of the dots produced.
2. Place thin braid or small wire from the pendulum to the keys ground wire nut. Otherwise the current flow to the Transceiver has to pass thru the keys pivots.. which can cause erratic scratchy keying.,,,,,,,,,,,,,,,,,,,,,,,,,,,,,,,,,,,,,,,,,,,,,,,,,,,,,,,,,,,,,,,,,,,,,,,,,,,,,,,,,,,,,,,,,,,,,,,,,,,,,,,,,,,,,,,,,,,,,,,,,,,,,,,,,,,,,,,,,,,,,,,,,,,,,
Below are some older Youtube video's I made of the Model X keys using speed control devices. Plus a video of a 1906 Deluxe Vibroplex. The 2 square weights that come with the Mod X keys provide a very narrow speed range. I prefer to use a 360 deg rotating speed control with a speed control rod on the Mod X. Which allows ultra fast speed changes. In 1959, I was adjusting and using a Vibroplex Presentation on 20M ham band when a fellow with the call sign RAEM kept calling me.. and I finally asked him why he had such an odd call .. when he explained he was a Russian Hero and they gave him the same call sign he used in the military due he saved so many lives by sending the distress message. And you can see the neat Qsl card RAEM sent me with the letters UPOL on it below. The Russians even have an annual RAEM contest in his honor.
Below is a picture of the dot/dash contact on an early Mod X---showing the leaf spring contact and the Dash Lever with insulating material in its tip. You can see the coil spring-- which tensions the dash lever towards the right. The dash lever position screw is just below the coil spring-- which sets the position of the dash lever --so that its not touching the leaf spring contact while at idle. And you can see --the right and left positioning screws ---which positions the pendulum properly. The left and right pendulum positioning screws are locked in place using the set screws.


Below is a 1920 New and Improved Mod X and you look closely--- you can see they placed the Dash Spring Tension Adj knob at the right side of the key. The small adj screw at the very end of the dash arm sets the clearance from the end of the dash arm to the long leaf spring. Its important that the end of the adj screw has insulating material on it ---and its position is set so that the insulating material does not touch the leaf spring at idle. It has a standard round dot arm for round weights... So it really is an improvement of Mod X. I have it equipped with a speed control that rotates 360 deg. There were several versions of the new and improved Mod X until it was finally discontinued in 1922.

Below is picture of the Improved 1920 Mod X showing how they added a pivot pin to the pendulum in order to support the Dash Lever.. using a collet at top and bottom to hold the pin.


And a 1918 Mod X that desperately needs to be torn apart and the paint renewed. Its had a lot of hard use the past 102 years !!! Its equipped with a 360 deg rotating speed control.

Below is a TAC S600 Super Steam Key. Made by the Telegraph Apparatus Co in Boston Mass before production was moved to Chicago Ill. Its a very well made heavy based key. The Deluxe MAC key and the Deluxe S600 were the only 2 keys ever made that had proper grounding from both the dash lever and the dot lever using heavy braid to ground. So that the key has perfect continuity over to the wire nuts. Vibroplex jeweled bearing deluxe keys provided ground braid only from the dash arm to ground. But they didnt provide ground braid from the keys pendulum to ground. All speed keys ever made should have had braid to ground from both the dash lever and keys pendulum --like on this S600 key. It didnt make that much difference back in 1905 --when the speed key was invented --due in those days large amounts of current were required to key landlines. While modern solid state transceivers only require only a tiny bit current flow and without proper ground from the key contacts--- it can and will cause scratchy dots.

Below is a picture of the heavy braid to ground from both dash arm and pendulum on the S600 TAC key while the production was in Boston.
Below a Vibroplex Deluxe Original next to a Vibroplex Mini key. The mini key is a one up and a kick to send with due to tiny size and how well it keys up. A very snappy robust key!!

Below is 1914 Original in excellent condition!! These over 100 yr old keys always require the paint along the sides of the keys be renewed. Due to rough handling.. On this key, I've renewed just the black paint along the keys 4 sides.

Below is a FA Wilcox 007 Canadian key -- An interesting key with unusually huge diameter fixed contacts. Its serial number 007 ----stamped on the articulated damper. The fixed contact for dots is over 1/2" in diameter !!!


The Canadian Maple Leaf WW2 Toronto key, used by the Canadian military during WW2 in ads with an attractive woman operator ----to interest men into joining the WW2 signal corps. It has a flat dot arm and is a very small key. The only markings on key is the Canadian Maple Leaf decal with the words "Toronto Canada" as shown in the lower picture. The key produces great code. It has unusual spring loaded wire nuts.


An Unusual 1912 Vibroplex Original nickel plated with Red Terracotta finger pieces. The main spring on it is extra long -- which dosnt allow for higher speed dots and causes the dot arm to flop around too much on the damper. So I made a mechanical device to reduce its length.. which is shown in the picture. By 1912, Horace Martin was using shorter main springs on most 1912 keys but not on this particular one--- unfortunately.. When Horace first started making the Vibroplex Original in 1905, he was using longer main springs-- but this 1912 main spring was extra long.. I'm going to make a better device to limit its main spring length. The best and most robust main spring ever placed on a speed key was on the WW2 Bunnell J36.. if you like sending high speed code, its the most robust speed key ever made !!


Now--- for the Original which started it all in 1905.. 1905 #749 Vibroplex Original. It has an extra long main spring.. The length of the main springs were not reduced till about 1912. The longer main springs cause the dot arm to flop around too much on the damper wheel.. and it also limits the high speed end. On this key, someone was very kind and silver soldered on all new silver contacts. In the second picture you can see a close up of the long main spring and dot contact assembly. The U shaped dot contact leaf spring assembly is very tiny compared to keys made a few yrs later. But the key can be adjusted for very decent code. These very early keys had an adjustable damper. By 1914, Horace Martin finally got the main spring length correct for Vibroplex keys. The main spring length on the Bunnell J36 above is 3/8" while the main spring on the 1905 Vibro is 9/16". But its also the quality of the spring material used that is also important. Some vintage Speed Keys have such weak main springs that they can barely produce 6 or 7 dots in a row. There are 3 pictures of this great condition 1905 key below..


The A to Z keys were made in Chicago by the Electric Novelty Co. called "The Improved Vibroplex". This is serial 5330. It has a copper plated base. This one has the rare name plate --as most name plates were removed from the keys due Vibroplex won a law suit against them for patent infringement. This one is probably from around 1912 to 1914 time frame. Unfortunately, the copper plating is thin and has faded out. This key would have been illegal to use due it violated the patent rights of Vibroplex and probably why its remained in such good condition.
Below is a close up of the name plate and a shot of the left side. It makes very good code and its a very heavy --due to the extra thick base material. Much heavier than Vibroplex Original keys. The contacts are in like new condition. So the key dosn't appear to have had much use. & Makes excellent code.


Below is a Les Logan 501 Serial R15 .. he only used serial numbers for a short time at the very beginning of production. He had his other family members helping run his machine shop enterprise in San Fran and he did everything possible to cut expenses on the his Speed X brand. He used pot metal castings for the main frame instead of using brass castings like he should have. The screws can seize up in the pot metal over time unless a lubricant is used. But Les did use high quality main springs on all his keys. Which allows his Speed X keys to produce high quality dots. The first speed key I ever purchased was a tiny Les Logan 515 in 1958 for less than $5. Which I later converted into a keying paddle. Les Logan sold his Speed X brand to EF Johnson in 1947 and it was all down hill after that. Although Johnson came up with the neat Squeeze weights --which were well made.
Below is picture of the early name plate serial R15. The contact material he used for dot and dash are high quality and easy to keep clean on this early key. Its the only key I know of that has screw on fixed contacts.. which have 8-32 threads. But shame on Les Logan for using Pot Metal frames!!! The T handles of the pot metal main frame will break off easily if your not careful.


The proper way to slow down the dots is to place a speed control device on the key.. The device on the Mac key shown above has a triple slide arrangement. 1. the body of the speed control slides back and forth on the dot arm. 2. the weight rod slides back and forth. 3. the weight itself slides back and forth. So its very easy to set the speed of the dots from fast to slow using this type of speed control. It has a 1/2" aluminum body and on this one I used a simple nail for the sliding weight rod. Nails up to 4" long can be used.. even galvanized nails--- after the rough surface has been sanded down. But normally I use stainless steel rod --since it can be cut to any length desired. All it requires is drilling 4 holes in the aluminum body--- taping 8-32 threads in 2 of them for the nylon thumb screws.
Frank W7IS
________________________________________________________________________________
When McElroy sold his key business, it became The Telegraph Apparatus Co in Chicago and here are 3 of the TAC keys.
The large chrome based TAC key nick named Hole in the Wall bug due to its large round hole at the front. Here is picture of a very condition example. It produces excellent code. An extra large heavy key with very high quality plating.

And a TAC S600 Stream key .. the plating wasnt the best on it.. But this key has had a lot of heavy use.. probably on commercial telegraph lines. Its also missing the name plate.

And here is a TAC black crinkle base in excellent condition. You can see the dental floss around the U shaped dot contact assembly to prevent fuzzy sounding dots. Without the dental floss the key produces fuzzy sounding dots due the U shaped dot contact spring goes into high speed self oscillation after making a series of dots. Which can only be seen with a magnifying glass.

I haven't included any hand keys in this Blog until now...!!!
I have a large collection of hand keys and one in particular is very unusual. I acquired years ago in a package of other keys... its a WW2 Military hand key ... used with a military radio set. Which radio set I have no idea.. but its a very well made hand key.. What's very unusual about it is it included braid to ground from the dash lever so that the current flow dosnt have to travel though the keys pivots. I dont recall any other hand key that provided the braid to ground.. The braid to ground in order to prevent the current flow having to go through the keys pivots should have been provided on all hand keys. It has a very unusual tactile feedback ---audible sound as you key it... which would be a huge help for first time users who are learning the code. As it allows sending a perfect 3 to 1 dot to dash ratio for beginners while listening to the make and break of the contacts. Its a key that would work best sending below 30 WPM.


